Out Blog

How to Mastering Natural Light

August 30, 2018 Uncategorized
Barbara Pan Photography Sydney, Food Photography, Restaurant photography, Recipe photography, Still life photography, 食物摄影, 餐厅摄影, 食谱摄影, 静物摄影,

Natural light holds the key to unlocking the full potential of your food photography. The way sunlight caresses the curves of a perfectly plated dish can elevate it from mere sustenance to a work of art. In this article, we’ll explore how harnessing the power of natural light can transform your food photography, leaving viewers hungry for more.

  1. Choosing the Right Setup: Positioning your setup near a window or shooting outdoors can provide ample natural light for your photos. Look for soft, diffused light to avoid harsh shadows and overexposure.
  2. Timing is Everything: Experiment with different times of the day to find the perfect balance of light and shadow. The warm glow of golden hour can add a magical touch to your photos, while soft, diffused light on cloudy days creates a flattering softness.
  3. Controlling Harsh Light: Sometimes, direct sunlight can be too harsh for food photography. Use diffusers or sheer curtains to soften the light and create a more flattering effect. Reflectors can also be used to bounce light back onto your subject and fill in shadows.
  4. Embracing Shadows: Don’t be afraid to embrace shadows in your photos. They can add depth and dimension to your images, creating a sense of mood and atmosphere.

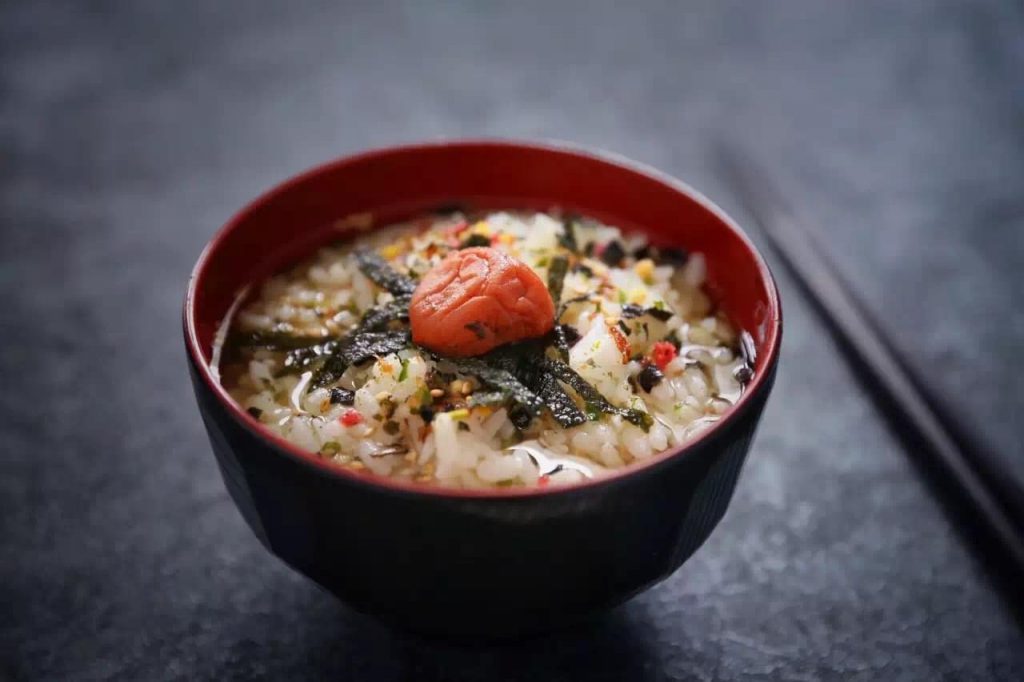
Example: Consider this example of a beautifully plated salad bathed in soft, diffused light from a nearby window. The gentle shadows add depth to the image, highlighting the textures of the fresh greens and vibrant vegetables.

Food Photography-Composition Magic

Barbara Pan Photography Sydney, Food Photography, Restaurant photography, Recipe photography, Still life photography, 食物摄影, 餐厅摄影, 食谱摄影, 静物摄影,

Composition is the secret ingredient that can take your food photography from ordinary to extraordinary. By carefully arranging elements within the frame, you can create images that are not only visually appealing but also tell a compelling story. In this article, we’ll explore the art of composition and how it can elevate your food photography to new heights.

  1. Finding the Right Angle: Experiment with different angles to find the most flattering view of your dish. Whether it’s a straight-on shot or a bird’s-eye view, each angle offers a unique perspective that can enhance the visual appeal of your photo.
  2. Playing with Perspective: Use perspective to add depth and dimension to your images. Shooting from above can highlight the textures and colors of your dish, while shooting from below can create a sense of drama and grandeur.
  3. Utilizing Negative Space: Don’t be afraid to leave empty space in your photos. Negative space can draw the viewer’s eye to the main subject and create a sense of balance and harmony in the composition.
  4. Incorporating Leading Lines: Use lines within the frame to guide the viewer’s eye towards the main subject. Whether it’s a row of utensils or a diagonal tablecloth, leading lines can add visual interest and draw the viewer deeper into the image.

Example: Imagine a close-up shot of a decadent chocolate cake, captured from a slightly above angle to showcase its layers and textures. The use of negative space around the cake draws the viewer’s eye to the delicious dessert, while leading lines in the form of chocolate drizzle guide them towards the focal point.

Food Photography-The Power of Storytelling

April 14, 2018 Uncategorized
Barbara Pan Photography Sydney, Food Photography, Restaurant photography, Recipe photography, Still life photography, 食物摄影, 餐厅摄影, 食谱摄影, 静物摄影,

Food photography is more than just capturing beautiful images – it’s about telling a story that resonates with your audience on a deeper level. Whether you’re showcasing a mouthwatering recipe or highlighting a culinary experience, every photo should evoke emotion and spark imagination. In this article, we’ll explore the power of storytelling in food photography and how it can help you connect with your audience.

  1. Setting the Scene: Consider the context and narrative behind each dish you photograph. Is it a family recipe passed down through generations? A special occasion meal shared with loved ones? Use visual cues to convey the story behind the dish, from the ingredients used to the presentation and serving style.
  2. Creating Emotion: Think about the emotions you want to evoke in your audience. Is it a sense of comfort and nostalgia? Joy and celebration? Use lighting, composition, and styling to create a mood that resonates with your audience and draws them into the story.
  3. Engaging the Senses: Food photography is a multisensory experience that should engage all the senses. Use props, textures, and colors to evoke the taste, smell, and texture of the dish, creating a sensory experience that goes beyond the visual.
  4. Leaving Room for Imagination: Don’t reveal everything in your photos. Leave room for the viewer’s imagination to fill in the gaps and create their own story around the dish. Use selective focus, shallow depth of field, and strategic cropping to draw attention to key elements while leaving the rest to the viewer’s imagination.

Example: Imagine a photo of a cozy dinner scene featuring a steaming bowl of homemade soup served with crusty bread. Soft, diffused lighting and a rustic table setting evoke a sense of warmth and comfort, while the steam rising from the bowl hints at the dish’s savory aroma, inviting the viewer to imagine themselves sitting down to enjoy a comforting meal.


Food Photography-Post-Processing

April 13, 2018 Uncategorized

Post-processing, the final touch in food photography, empowers you to refine and elevate your images. Through adjustments in exposure, color enhancement, and detail refinement, you can transform your photos from good to extraordinary. In this article, we delve into the art of post-processing and its profound impact on food photography.

  1. Balancing Exposure and Contrast: Achieving the perfect balance of light and shadow is paramount. Use histogram tools to identify overexposure or underexposure, then adjust to ensure optimal brightness and contrast.
  2. Enhancing Color Vibrancy: Elevate the visual appeal by enhancing color vibrancy and saturation. Experiment with white balance settings for natural tones and use selective color adjustments to make specific hues pop.
  3. Refining Details and Sharpness: Enhance textures and intricacies by refining details and sharpening edges. Adjust clarity and sharpness to bring out fine elements, while using noise reduction techniques to minimize distractions.
  4. Setting the Mood with Filters and Effects: Experiment with filters and effects to infuse mood and atmosphere. Vignetting can draw focus, while soft focus effects add a touch of romance. Embrace creativity to evoke emotional responses.


Example: Imagine a delectable chocolate cake, meticulously edited to emphasize its luscious texture and deep, inviting color. By fine-tuning exposure, enriching colors, and refining details, the image becomes an irresistible invitation to indulge.


Conclusion

Mastering post-processing is pivotal in enhancing the visual impact of food photography. Whether aiming for realism or artistic expression, editing techniques allow you to shape your narrative and captivate your audience. By embracing post-processing, you can elevate your images and leave a lasting impression on viewers.

Food Photography-The Art of Styling

January 9, 2018 Uncategorized
Styling is an essential aspect of food photography that can take your images from ordinary to extraordinary. The right props can add personality, context, and visual interest to your photos, transforming a simple dish into a stunning masterpiece. In this article, we’ll explore the art of styling and how creative props can elevate your food photography to the next level.
 
  1. Choosing Props that Complement Your Dish: Select props that enhance the theme and mood of your dish. For example, rustic wooden boards can add warmth and texture to a rustic meal, while delicate floral arrangements can bring elegance to a dessert spread.
  2. Playing with Color and Texture: Experiment with different colors and textures to add visual interest to your photos. Mix and match props to create dynamic contrasts and harmonious compositions that draw the viewer’s eye to the main subject.
  3. Adding Context and Storytelling: Use props to add context and tell a story in your photos. Incorporate utensils, ingredients, and other elements that hint at the preparation and serving of the dish, creating a sense of narrative and authenticity.
  4. Keeping it Simple and Balanced: Avoid cluttering your photos with too many props. Instead, focus on a few key elements that enhance the visual appeal of your dish without overwhelming the composition. Remember that less is often more when it comes to styling.


Example: Consider a photo of a cozy breakfast scene featuring a stack of pancakes adorned with fresh berries and maple syrup. A vintage teapot and a sprig of mint on a rustic wooden table evoke a sense of warmth and nostalgia, enhancing the overall mood of the image.


Conclusion

By mastering the art of styling and incorporating creative props into your food photography, you can create images that are not only visually stunning but also tell a compelling story. Whether you’re shooting for a restaurant menu, a cookbook, or an advertising campaign, styling can make all the difference in capturing the attention of your audience.